I have my cartridges, but the package does not list my printer
Each cartridge type is is often used in a wide variety of printers, therefore you might find that your printer model is not indicated on the cartridge box or/and label of the cartridge inside. This could be because there is not enough space on the package and/or cartridge to include the whole list of the printers that are compatible with the cartridge or your printer is new. Before opening the product package, please ensure you have ordered the correct cartridges for your printer. Please get in touch with us if you have any doubts.
I have my cartridges, but it's the wrong size - it's big or small
Make sure all packaging and strips have been removed from the cartridge and that it is being inserted into your machine the correct way around. Please ensure that you do not remove the chip from the cartridge.
The cartridge may look slightly different to your old cartridge. This will make no difference and the cartridge will fit into your printer as normal.
If the cartridge size is completely the wrong size. for example the cartridge removed from your printer is larger than the new toner cartridge you have received. The cartridge removed from your printer could be the toner cartridge and drum unit combined. You must take the old toner out from the drum and replace it with the new cartridge we've sent you. This simply done by pressing the button or lever on the drum unit, usually its a green or blue button.
My printer does not recognise the installed cartridge
A "Cartridge Not Recognised" or "Cartridge Problem" notice displays on your computer or printer screen after you have installed a new printer cartridge.
Why does this happen?
The electrical contacts within your printer will be connected to the cartridge contacts after it is installed, allowing for proper operation. On rare occasions, you may get an error message warning that a cartridge cannot be recognised while being used. This could be due to the ink in the cartridge may have run out or the incorrect cartridge may have been installed, for example.
What do I need to do?
Please use the simple checklist below to help you determine the source of the error:
- Has the correct cartridge been put in your printer?
An error message will appear on the printer's display if the incorrect cartridge is installed. - Has the right slot been used to insert the cartridge?
The printer won't accept a Colour cartridge in a Black slot, for instance. - Is the ink level low or empty if the cartridge was operating properly before the fault surfaced?
When empty, non-original cartridges can display as unrecognised. - Even though you might have already done so, we always advise double checking to be sure nothing was missed.
- The next step we suggest is to make sure the chip contacts are clean if you are certain that the right cartridges are inserted and in the correct slot.
Cleaning the Chip Contacts on the Cartridge
- Keep the printer turned on.
- Remove the cartridges from the printer and ensure that all contacts and electronics are free of dust and dirt and then re-insert the cartridges into the machine.
- Leave the printer turned on. Unplug the machine from the mains.
- Leave the printer to stand unplugged for a minimum of 20 minutes.
- Plug the printer back into the mains.
- Perform a cleaning cycle (head clean / nozzle clean) if needed to get the ink flowing correctly through the cartridge.
- With non-original cartridges, the ink level indicator will usually show as LOW or EMPTY. This is normal. Once you have informed the printer that you are happy to proceed the printer will then allow you to print. Please be safe in the knowledge that your replacement ink cartridge is full and will last at least as long as an original cartridge.
- If you have a Canon printer: Try to print something and, if required, hold down the cancel button (sometimes a red upside down triangle symbol) for up to 5-10 seconds and then the printer will allow you to print.
Click on the button to download the PDF version of the Printer Reset Instructions to get your non-original cartridges working again.
Watch step-by-step Video
How do I fix faded or faint printouts?
Dried ink particles that block your inkjet printer are a common reason why your prints are faded and faint. It is advised to print a few pages each month to keep the print quality up because the printheads on an ink cartridge might become blocked if the printer is not used for a while. This will lessen the chance of the printhead being clogged and the ink drying up in the ink cartridges.
If your prints are faded or faint on a toner cartridge then it could mean that the toner cartridge is nearing the end of its life. Please check the toner level and replace the toner that is low or empty.
The kind of paper being used might also impact print quality. For instance, the colours may not appear as brilliant when printing images on normal paper or thin paper as they would when using photo paper, which is made specifically for printing photos.
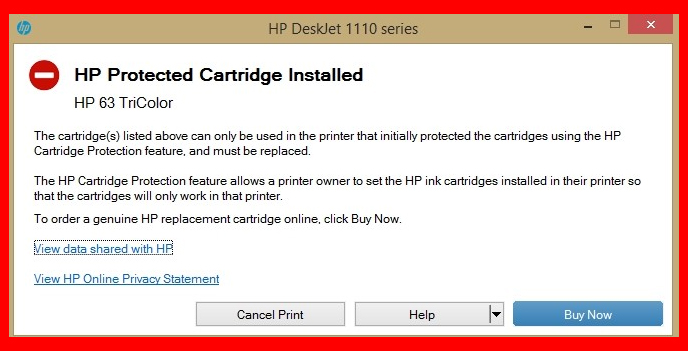 HP Protected Cartridge Error
Hewlett-Packard (HP) have introduced an ‘HP cartridge protection’ update on their ink cartridges as part of their latest update to lock the ink cartridges to a specific printer so that you cannot use that ink cartridge again in any other printer(s). This happens as soon as an ink cartridge is installed into an HP printer and "locks" itself to that specific printer, which means that it can only be used in that particular machine. This also means that if you were to get an identical model of your printer you cannot use the same cartridge in the replacement model and also the cartridge becomes non-recyclable as it cannot be refilled, recycled or remanufactured to use in another printer and it will just end up in landfill.
What this means to our customers is that certain HP compatible cartridges that are inserted into your printer will show an "HP protected cartridge" error message on their computer. This means that they will not work with your printer and will only work with the 1st printer that the cartridge(s) were inserted into. This can be easily resolved by following the step-by-step guide which is below:
Turn off HP Cartridge Protection Setting or Remove an “HP protected cartridge” error
Preventing the error message from appearing in the first place can be achieved by disabling the original cartridge protection feature in your printer settings.
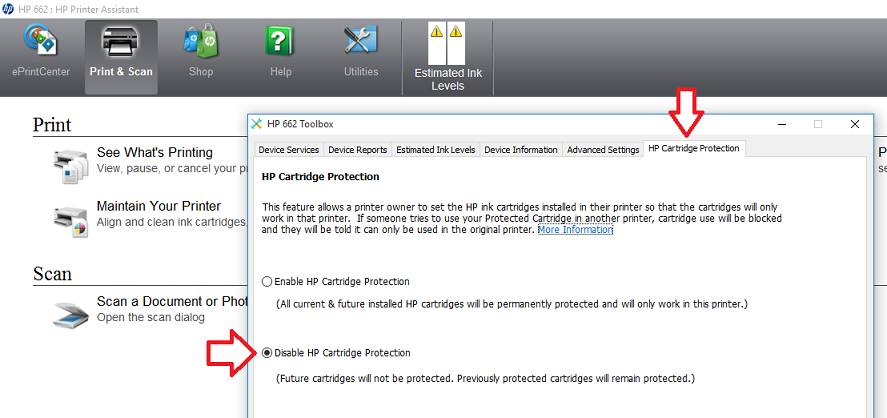 If your printer does not have internet features:
If your Hewlett-Packard printer does not have any internet features you can simply go into your printer settings which can be located on your printer menu and you will see the option to disable the HP cartridge protection. Just select the disable option and click Apply and Save if necessary.
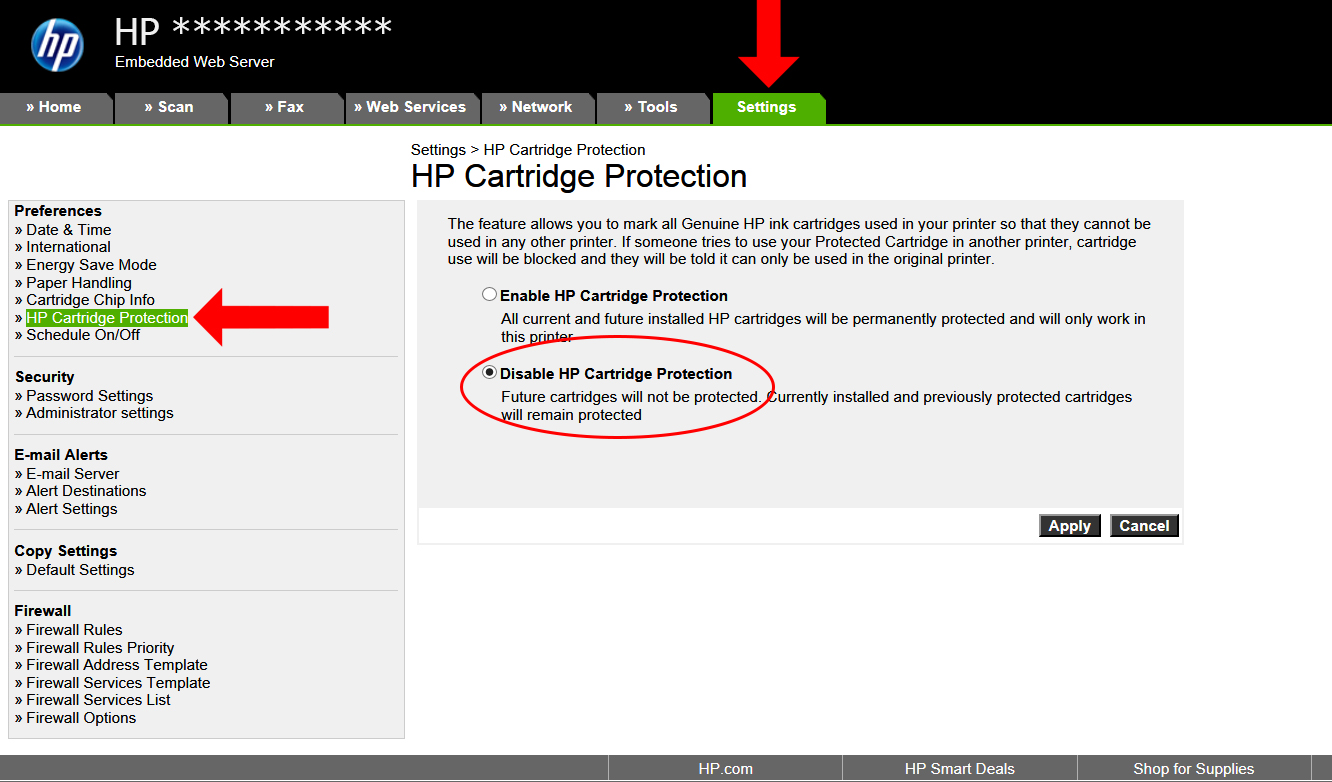 If your printer has internet features:
- Open up a web browser and enter your printer’s IP address on the web address. Your printer’s IP address can be found on your printer settings by navigating your way to network setup options.
- This will open up the printer’s Embedded Web Server. Click on the Settings option and to the left hand side select HP Cartridge Protection.
- Make sure you select Disable HP Cartridge Protection and click Apply or Save.
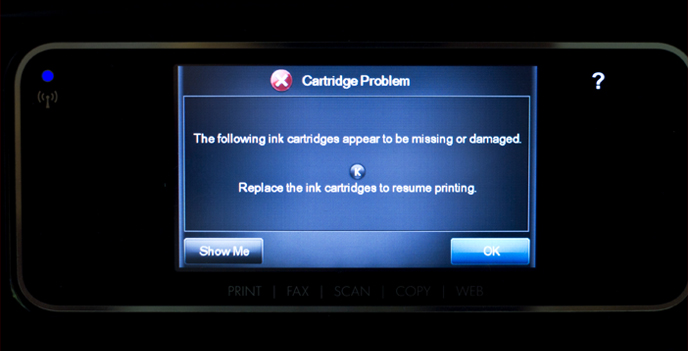 HP Firmware Update for "Cartridge Problem" error message
Defect: Your printer displays an error message about one or more defective cartridges.
Reason: HP has in its firmware a timer, which has expired and therefore the use of non-original cartridges is being refused.
Solution: You must download and install the latest firmware from the HP Support Site. The error message is then extinguished automatically and the user can continue to print as usual.
You can find the manual and the latest firmware installation for your printer here: HP Support.
Your printer will recognise your cartridges again after installation.
Please note:
This firmware update ONLY applies if all three of the following conditions are met:
- 1. You are using compatible cartridges (non-original)
- 2. Your printer displays a Cartridge Problem error message. Other error messages are not related.
- 3. Your printer is one of the following models from the series (Other HP printers are not affected, only the following are):
OfficeJet Pro 6230 series
OfficeJet 6810, 6820 series
OfficeJet Pro 6830 series
OfficeJet Pro 8610, 8620, 8630, 8640, 8660 series
OfficeJet Pro X451dn/dw, X476dn/dw, X551dw, X576dw
Epson Firmware Updates
Defect: Your Epson printer is unable to utilise compatible cartridges (non-original) and blocks them from being used in your Epson printer.
Reason: Epson have created a new firmware update, meaning if you have installed the latest drivers you will not be able to use any of our own branded cartridges.
Solution: As a general rule, if you want to continue using compatible cartridges do not accept any updates / firmware. These messages may show up in dialog box from Epson software on your computer, or on the printer itself. The easiest way to prevent your printer from installing this update is to go into your Epson Printer’s settings and select “never” in the driver update settings.
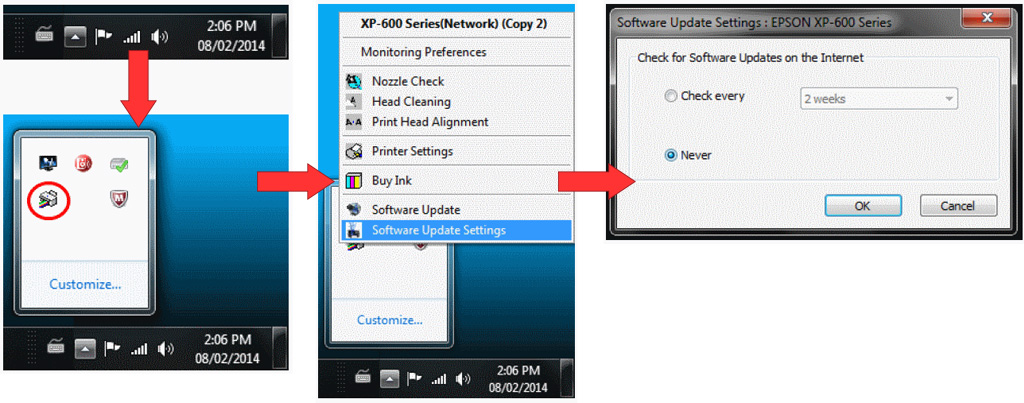 How to change Automatic Update Settings - Standard EPSON Printer Software on Windows
Your printer software may automatically checks for firmware updates to the printer driver. You can change how often the software on your PC checks for updates or disable this feature by following the instructions below;
- Right-click the product icon in the Windows taskbar.
- Select Auto Update Settings.
- Change the update option here by disabling the automatic update feature by selecting the Never option.
- Click Apply and OK to exit.
This will only apply to anyone with these following printers and/or cartridges:
- Epson Expression Premium XP-530 Printer
- Epson Expression Premium XP-630 Printer
- Epson Expression Premium XP-640 Printer
- Epson Expression Premium XP-830 Printer
- Epson Expression Home XP-330 Printer
- Epson Expression Home XP-340 Printer
- Epson Expression Home XP-430 Printer
- Epson Expression Home XP-434 Printer
- Epson Expression Home XP-440 Printer
- Epson Expression Home XP-446 Printer
- Epson T288 / T288XL Ink Cartridges
- Epson T410 / T410XL Ink Cartridges


